Tips & Inspiration
Our library of gardening resources on topics ranging from seed starting to perennial care and beyond!
Click Here
When planning to install any plant into your landscape you must first assess how much sunlight the area you are considering planting receives. It is important to determine whether it is full sun, partial sun or full shade. Full sun is defined as more than six hours of light, generally south or west facing. Partial sun is three to five hours of sun, including morning sun locations that are generally east facing. Shade is no direct sun or light filtered through trees, otherwise known as dappled light, as well as the north side of your landscape. Be mindful of trees or other obstacles that could block the sun in the future. It is vital to ensure you have adequate light for the plant that you select since this will influence leaf development, flowering and the overall health of the plant. Carefully read the tag of the plant(s) you are considering purchasing to ensure that you have the appropriate light conditions. Some tags use symbols such as a picture of a sun for full sun, a picture of a sun with clouds for partial sun and a picture of clouds for full shade. If there is no information on the tag ask a staff person to assist you in looking up information on the plant.
Soil conditions are another important factor to consider. If the soil is not suitable for a particular plant it will increase the uncertainty of whether the plant can or will survive. For example, if there is a consistently wet area, the plant selected for that location must be able to cope with having "wet feet", such as a willow (Salix). Certain plants cannot survive or thrive under such conditions. Other areas can be dry and arid, so plants that can survive droughts and dry conditions would have to be selected. Digging a "test" hole will help determine drainage and soil consistency. Soils mostly made up of clay or fine sediment will have reduced and poor drainage. Some plants thrive in rough rocky conditions whereas others need soft loamy soils. Amending your soil can help accommodate a wider range of plants in that area. The initial quality of the soil will dictate how much the area needs to be amended (further instructions below).
Planting can begin either once a specific plant has been selected for a specific area, or conversely after you have found an ideal location for a specific plant.
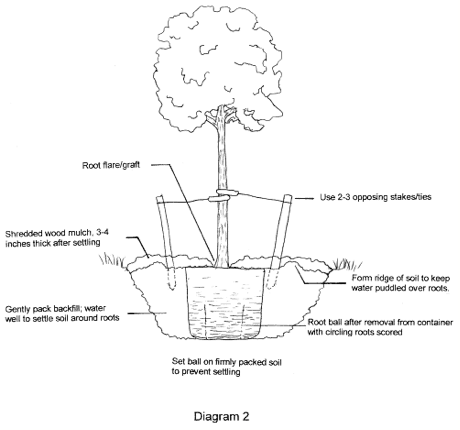
Dig the hole as deep as the soil level in the pot or slightly deeper, depending on the requirements of your specific plant. If the soil in the bottom of the hole is compacted it is recommended to loosen it up and lightly amend it. The width of the hole should be 2-3 times bigger than the diameter of the pot that the plant is currently in. Loosen the soil around the edges and inside the planting hole. These edges should be slightly angled away from the center of the hole. Make sure the potting soil that the shrub is planted in is moist before removing the pot you purchased it in. Gently loosen up the root ball of the plant. If the bottom of the root ball is whirled and pot bound (roots wrapping around itself in circles) the bottom inch or two of the root ball can be cut off with a knife. Loosen the sides of the root ball by tapping the soil and pulling the bottom roots out of the circular shape of the pot.
Before placing the plant in the hole, the backfill soil needs to be amended. Amending the soil will help insure that there are a wide range of both macro and micro nutrients available to the plant which will drastically improve the health of your shrub. Mixing compost or composted manure with the soil that was removed from the hole will have positive benefits as well. Sometimes you can buy a 3-in-1 soil that has peat, compost and black earth, so you just need to buy one bag of soil and mix it with the existing soil. When amending soils it is very important to mix it well and to make sure that the native soil is included in the backfill. It is also essential to know what pH certain plants thrive in. For example, Lilacs perform best in Neutral soil (7). If peat moss or black earth was incorporated into the soil mix it would be safe to assume that that the soil pH is going to be around 5.2-5.5pH, which is acidic. Lime will have to be added to help neutralize the soil. If a Rhododendron was planted in that same soil mix the pH would not have to be changed because Rhododendrons grow best in acidic soil (5.0-6.0).
Put an inch of your amended soil mixture in the bottom of the hole and sprinkle bone meal in the bottom of the hole. The amount you use will depend on how big the root ball of the shrub is. Lightly mix the bone meal into the soil in the hole. Bone meal helps the root system of the plant develop faster because it is high in phosphorus. If you have a pest problem like raccoons, for example, a starter fertilizer like 10-52-10 could be used instead (be sure to follow the product instructions on the side of the container). Ideally, you want the plant to work on root development during the first year of planting so other fertilizers are not recommended. If the plant tries to flower or fruit on the first year it is advisable to remove all blossoms and or fruit because it takes a significant amount of energy away from the plant. The following season use an appropriate fertilizer for the type of shrub, whether it is a flowering shrub, evergreen or broadleaf evergreen after the sign of first growth.
Place plant in hole and backfill half way. Lightly tamp the soil in place to remove any air pockets. Finish backfilling around plant, lightly tamp soil again. Create a circular berm a short distance around the plant from where the hole was dug; this will help with watering. Water in the plant to help remove air pockets and to settle the soil even if the ground or plant is wet.
You may want to consider staking your plant if it was planted in a windy area or the shrub itself is very tall. When placing the stakes make sure that they are not so close to the root ball that it is punctured by the ends of the stakes. Use two to four stakes with one on each side of the tree, making sure that one of the four is on the windward side. You can purchase nylon ties or hose segments that can be wrapped around the sturdy main trunk and attached to the stake with wire or rope. There are also kits available if you do not want to buy the components individually.
During the first year after a shrub is planted it will be dependant on the homeowner for water while the root system is still getting established. It is better to do a long deep watering than to do frequent short periods of watering. Small watering encourages a shallow root system that is not healthy for the plant long term. There is a fine line between over and under watering. This depends on the make-up of the soil and the precipitation that mother nature provides. The hotter and drier it is outside the more water is needed. The plant should be able to fend for itself the following season unless there is a drought. If that is the case then the plant may again need some assisted watering.
When you research information on the particular requirements of specific plants, and how to best optimize your conditions, only use government and/or university, peer-reviewed studies. Compile a number of those articles and/or studies and compare them to one another to help ensure the accuracy of the information they provide.
Our library of gardening resources on topics ranging from seed starting to perennial care and beyond!
Click HereHave questions? We have answers! Send us a message and we'll be here to help every step of the way.
Click Here